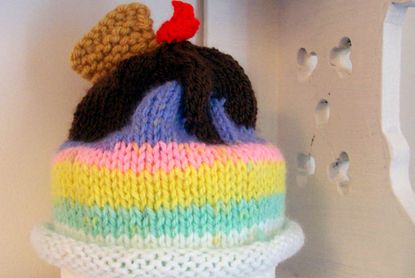
Ice cream baby hat knitting pattern
Knit this gorgeous little hat for your new baby with this free knitting pattern from our mummy blogger B.


Knit this gorgeous little hat for your new baby with this free knitting pattern from our mummy blogger B.
'The baby hat pattern itself doesn’t involve much skill, but if you have never knitted in the round before (i.e. used circular or double pointed needles) then this is worth researching first as the technique can be tricky to get used to. The pattern also calls for the Icord technique towards the end.'
Don't forget to check out our other free knitting patterns, which is full of adorable projects!
You will need:
• 4 x 5mm (US 8) double pointed needles • 4 x 4.5mm (US 7) dpns • stitch marker (optional) • c1 (colour 1): DK yarn of your choice for the main ice cream part of the hat • c2 (colour 2): DK yarn of your choice for the sauce topping part of the hat • c3 (colour 3): DK yarn of your choice for the cherry • cream/beige chunky knit yarn for the wafer (optional)
Abbreviations
• r1, 2, 3 etc: row 1, 2, 3 etc • co: cast on/cast off • st/sts: stitch/es • dpn: double pointed needles • c1: colour 1 • c2: colour 2 • c3: colour 3 • k: knit • k2tog: knit 2 stitches together • kfb: knit front and back of stitch (to create 2 stitches out of one)
GoodtoKnow Newsletter
Parenting advice, hot topics, best buys and family finance tips delivered straight to your inbox.
Gauge/tension: Up to you, but try to keep it consistent throughout. You may find your first few rows using 4.5mm needles are a bit tight, and this part of the hat is intentionally meant to curl up to create a rim. When you begin to interchange yarn colours towards the top of the hat, keep your eye on the tension here: you don’t want to pull the yarn too tight when changing colours so as to misshape the hat.
Knitting pattern
co 64 sts across 3 4.5mm dpns, using your c1 yarn, and join in the round with row 1. Use a stitch marker or your cast on tail as a guide to mark the beginning of the row:
• r1-5: k 5 rows
change to 5mm dpns from now on:
• r6-23: k 18 rows
join c2 yarn, leaving a long-ish tail and:
• r24: k2 c2 sts (knit 2 colour2 stitches), k14 c1 sts, k5 c2 sts, k8 c1 sts, k4 c2 sts, k8 c1 sts, k3 c2 sts, k20 c1 sts • r25: k2 c2 sts, k13 c1 sts, k7 c2 sts, k7 c1 sts, k4 c2 sts, k7 c1 sts, k5 c2 sts, k19 c1 sts • r26: k2 c2 sts, k14 c1 sts, k8 c2 sts, k7 c1 sts, k2 c2 sts, k7 c1 sts, k7 c2 sts, k11 c1 sts, k4 c2 sts, k2 c1 sts • r27: k2 c2 sts, k13 c1 sts, k9 c2 sts, k6 c1 sts, k2 c2 sts, k6 c1 sts, k8 c2 sts, k10 c1 sts, k7 c2 sts, k1 c1 st • r28: k3 c2 sts, k12 c1 sts, k10 c2 sts, k13 c1 sts, k9 c2 sts, k8 c1 sts, k7 c2 sts, k2 c1 sts • r29: k3 c2 sts, k12 c1 sts, k10 c2 sts, k13 c1 sts, k10 c2 sts, k7 c1 sts, k7 c2 sts, k2 c1 sts • r30: k4 c2 sts, k10 c1 sts, k11 c2 sts, k3 c1 sts, k6 c2 sts, k3 c1 sts, k11 c2 sts, k6 c1 sts, k9 c2 sts, k1 c1 st • r31: k4 c2 sts, k9 c1 sts, k11 c2 sts, k1 c1 st, k8 c2 sts, k2 c1 sts, k12 c2 sts, k6 c1 sts, k9 c2 sts, k1 c1 st • r32: k5 c2 sts, k8 c1 sts, break c1 yarn and leave long enough tail to sew up, k36 c2 sts, re-join c1 yarn, k5 c1 sts, k11 c2 sts • r33: k5 c2 sts, k7 c1 sts, break c1 yarn and leave long enough tail to sew up, k52 c2 sts • r34: k64 c2 sts
Now it’s time to decrease stitches towards the peak of the hat:
• r35: *k2tog, k6 sts*, repeat *this* to end of row (56 sts remaining) • r36: *k2tog, k5 sts*, repeat ** to end (48 sts) • r37: *k2tog, k4 sts*, repeat ** to end (40 sts) • r38: *k2tog, k3 sts*, repeat ** to end (32 sts) • r39: *k2tog, k2 sts*, repeat ** to end (24 sts) • r40: *k2tog, k1 st*, repeat ** to end (16 sts) • r41: k2tog to end of row (8 sts) • r42: k2tog to end of row (4 sts)
Now for the cherry. Slip remaining 4 sts onto 1 single dpn. Break c2 yarn and leave long enough tail to sew up. Join c3 yarn for the cherry:
• r43: k 1 row • r44-57: k using Icord method • r58: still using Icord method – k2tog, k2tog (2 sts remaining) • r59: still using Icord method – k2tog (1 st remaining) • cast off stitch • you should now have a long tube/tail. Tie this in a knot to form a cherry shape.
How to Icord
To Icord you have to use double pointed needles as it involves sliding stitches from one end of the needle to the other.
With your stitches on one needle, knit across the row. Your stitches will now be on the other needle. Instead of turning this needle to knit a new row, slide the stitches to the other end of the needle, pull the yarn across the back of the row, and knit again. Continue this and eventually a tube will form. There are lots of demonstrations online if this information is not helpful.
Wafer (optional)
All stitches are knitted; no purling necessary.
co 5 sts, with a long enough tail to sew onto hat
• r1: k all sts • r2: k all sts • r3: k1, kfb, k1, kfb, k1 (7 sts) • r4-7: k all rows • r8: k1, kfb, k3, kfb, k1 (9 sts) • cast off stitches. Thread your cast off tail down the side of the wafer through the stitches to meet up with the cast on tail. Use these tails to sew wafer onto hat.
Making up
Stitch the wafer to the hat in a position of your choice. Sew up and tie in all your loose ends on the hat.
If you turn the hat inside out, you will notice there are loose lines of yarn where you have alternated colours towards the top of the hat. If you have been careful with your tension, these shouldn’t affect the shape of the hat, and won’t be noticeable once placed on your baby’s head.
If, however, you’d rather a more polished finish, you could always knit a second hat as an inner liner. There is no need to change yarn colour for this hat, or knit a cherry. Simply follow the pattern from row 1-23, then without changing colour, knit a further 11 rows. Continue the pattern from row 35-42, and then without changing colour to knit a cherry, k2tog twice to decrease your 4 stitches to 2. Cast off these stitches. Turn the hat inside out, slip it inside the outer hat, and join the two together by sewing along the rim, and then sew the two peaks together with a few stitches.
Trusted, informative, and empathetic – GoodToKnow is the ultimate online destination for mums. Established in 2007, our 15-year-strong archive of content includes more than 18,000 articles, 1,500 how-to videos, and 7,000 recipes.
-
 Is your tween angry, entitled, and rude? Teenage expert reveals why this is happening earlier than you might expect (and it has nothing to do with hormones)
Plus 7 top tips to try that might help you and your family navigate this tricky time
By Sarah Ockwell-Smith Published
-
 Prince William ‘reduced King Charles to tears’ with surprise plans to carry on vital family history
"I couldn't believe it - I was deeply touched and moved"
By Charlie Elizabeth Culverhouse Published