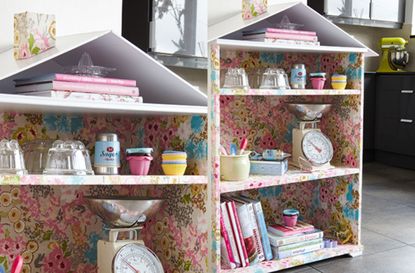
How to upcycle a cupboard with wallpaper
Cupboards don’t have to be purely functional, they can look beautiful to, as we prove with this easy craft project.


Cupboards don’t have to be purely functional, they can look beautiful to, as we prove with this easy craft project.
Turn an old bookcase or shelving unit into a quaint country-style storage solution. By covering each shelf in pretty floral wallpaper you can transform an old or dated piece of furniture into a thing of beauty.
You’ll be surprised at how easy and quick this is to do. Being able to make it in a day, this lovely craft project will give you a real sense of satisfaction and it’s sure to brighten up your home, killing two birds with one stone as they say!
Once you’ve finished making these stunning shelves you might be addicted to DIY furniture updates, and we wouldn’t blame you. Luckily you can use this technique on lots of things, from open shelves to the inside of drawers – there’s no end to the things you can brighten up with a bit of wallpaper and some know-how.
If you’ve made this then we’d love to see. Send us a picture via our Facebook so we can have a nosey, and show off about how clever our readers are.
Happy crafting!
You will need
-Bookcase
GoodtoKnow Newsletter
Parenting advice, hot topics, best buys and family finance tips delivered straight to your inbox.
-Metal ruler
-Fabric
-Scissors
-PVA glue
-Foam board
-Hot glue gun
-Scalpel
-Cutting mat
Step 1
Remove the shelves from your bookcase. Measure them and cut out pieces of fabric to fit over the top and front edges. Apply PVA glue to the surface of the shelf and stick down the fabric. Repeat for all shelves, then leave to dry.
Step 2
Cut pieces of fabric to fit the back and sides of your bookcase. You can do it in one large piece, but three smaller sections of fabric are easier to handle. Stick the fabric in place, as before. Leave to dry, then replace the shelves.
Step 3
For the roof, cut out two pieces of foam board the same width as your bookcase and 3/4 the length. Use a hot glue gun to secure the short sides of the board together. Add a few spots of glue to the top of the bookcase and position the roof in place.
Step 4
To make the chimney, cut out one small and three large rectangles of foam board. Cut off a triangular section at the bottom of two of the rectangles (the same angle as the roof). Glue them all together, then cover in fabric using PVA glue. Glue in place on the roof.
Trusted, informative, and empathetic – GoodToKnow is the ultimate online destination for mums. Established in 2007, our 15-year-strong archive of content includes more than 18,000 articles, 1,500 how-to videos, and 7,000 recipes.
-
 Compromising may be killing your relationship - here are 5 ways to reach healthy compromises, according to relationship expert
Compromising isn't always the best way to keep the peace in a relationship
By Charlie Elizabeth Culverhouse Published
-
 Best interactive pets for kids: 15 gift ideas for children of all ages
From puppies to axolotls, take a look at our selection of the best interactive pets you can buy that are sure to be a hit with little animal lovers
By Sarah Handley Published