Nativity cake
Follow our step-by-step picture guide to make this easy chocolate nativity cake. Once you’ve made the cake, you’ll need to mould the figures from fondant.
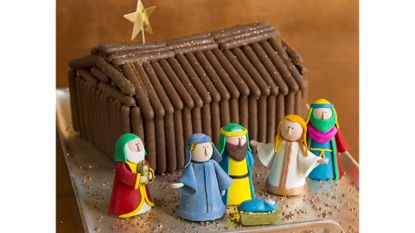

Our step-by-step picture guide makes preparing this chocolate nativity cake a doddle. It’s a chocolate lover's dream, with a rich cocoa sponge, smooth chocolate and gingerbread icing, encased in a layer of chocolate fingers.
Once you’ve made the nativity cake, you’ll need to mould the Jesus, Mary, Joseph from coloured fondant icing. You could make these based on the designs shown in the image above – or, follow our easy step-by-step guide to making nativity cake toppers. After a more traditional festive cake? Try Mary Berry’s cake Christmas cake recipe.
Ingredients
For the cake:
3 x 180g packs dark chocolate broken into squares 525g unsalted butter, at room temperature 525g golden caster sugar 14 large eggs 375g self-raising flour 125g cocoa 200ml milk
To decorate:
400g jar Lotus Biscoff Smooth Spread 400g jar chocolate spread 3 x 228g packets milk chocolate finger biscuits bronze rainbow dust edible glitter bronze crunch sprinkles nativity figures, made from a coloured fondant icing 10 straws gold glitter star cake toppers
You will need:
GoodtoKnow Newsletter
Parenting advice, hot topics, best buys and family finance tips delivered straight to your inbox.
Multi-size Cake Pan divided into two 25 x 15cm greased and lined. Or use two 20cm square tins
How to make this chocolate nativity cake
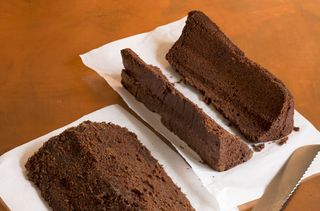
Nativity cake: Step 1
To assemble the cake, if you have used 2 square tins, trim off 5cm along the length of each cake to make a rectangular stable shape (the trimmings are not needed). Take the shallower cake and use a bread knife to cut off 2 triangles – 1 from each side – to create a large triangular roof.
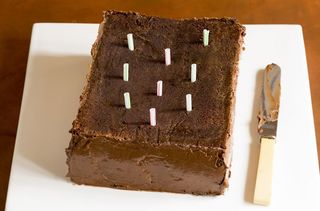
Nativity cake: Step 2
Put the deeper cake on to a cake board and trim the top off to level it. Push in a series of straws into the chocolate cake, trimming the ends so that they show 1cm above the cake (this will help support the cake and roof). Spread a generous layer of the Biscoff spread around the sides of the deeper cake.
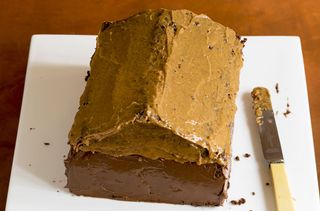
Nativity cake: Step 3
Spoon chocolate spread into a piping bag and pipe over the top of the base cake. Gently press triangular roof on the top of the base. Spread the roof with the remaining Biscoff spread
Nativity cake: Step 4
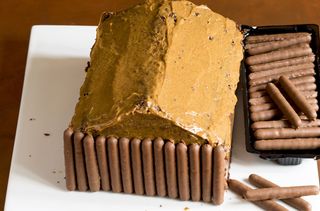
Arrange the chocolate finger biscuits around the sides of the base cake. Cut chocolate fingers to cover the roof ends and press on. Finish by arranging the chocolate fingers on the roof. Sprinkle a little bronze glitter rainbow dust on the roof and the bronze crunch pieces around the stable. Push in 1 or more gold star cake topper into the top of the stable.
You might also like... Mary Berry's Christmas cake Chocolate finger cake Malteser Christmas pudding
Nativity cake: Step 1

To assemble the cake, if you have used 2 square tins, trim off 5cm along the length of each cake to make a rectangular stable shape (the trimmings are not needed). Take the shallower cake and use a bread knife to cut off 2 triangles – 1 from each side – to create a large triangular roof.
Nativity cake: Step 2

Put the deeper cake on to a cake board and trim the top off to level it. Push in a series of straws into the chocolate cake, trimming the ends so that they show 1cm above the cake (this will help support the cake and roof). Spread a generous layer of the Biscoff spread around the sides of the deeper cake.
Nativity cake: Step 3

Spoon chocolate spread into a piping bag and pipe over the top of the base cake. Gently press triangular roof on the top of the base. Spread the roof with the remaining Biscoff spread.
Nativity cake: Step 4

Arrange the chocolate finger biscuits around the sides of the base cake. Cut chocolate fingers to cover the roof ends and press on. Finish by arranging the chocolate fingers on the roof. Sprinkle a little bronze glitter rainbow dust on the roof and the bronze crunch pieces around the stable. Push in 1 or more gold star cake topper into the top of the stable.
Shape and decorate Jesus, Mary, Joseph, kings and an angel with coloured fondant icing or use shop-bought clay dough figures to stand in front of the stable.

Jessica Dady is Food Editor at GoodtoKnow and has over 11 years of experience as a digital editor, specialising in all things food, recipes, and SEO. From the must-buy seasonal food hampers and advent calendars for Christmas to the family-friendly air fryers that’ll make dinner time a breeze, Jessica loves trying and testing various food products to find the best of the best for the busy parents among us. Over the years of working with GoodtoKnow, Jessica has had the privilege of working alongside Future’s Test Kitchen to create exclusive videos - as well as writing, testing, and shooting her own recipes. When she’s not embracing the great outdoors with her family at the weekends, Jessica enjoys baking up a storm in the kitchen with her favourite bakes being chocolate chip cookies, cupcakes, and a tray of gooey chocolate brownies.