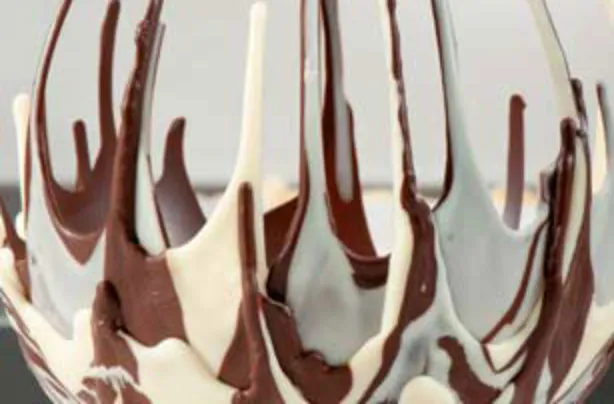

Love Choccywoccydoodah? If you want to learn how to make chocolate creations, this simple chocolate bowl is a great place to start.
Love Choccywoccydoodah? If you want to learn how to make chocolate creations, this simple chocolate bowl is a great place to start. You will need (makes one large bowl):
- 1 large balloon
- Sellotape
- 1 medium sized bowl
- 200g dark or milk chocolate
- 200g white chocolate
- Baking paper
- A sharp knife
- A sweet filling of your choice, such as strawberries and cream.
Step 1

In two separate bowls melt the two kinds of chocolate either in a microwave, or over a pan of boiling water. Make sure that the bottom of the bowl does not touch the water if using this method. Once the chocolate has melted, leave it to cool until it is around body temperature, (you can test this by dabbing a bit on your lip, if it doesn't feel hot, the chocolate is ready.) Cooling the chocolate is very important as the balloon may pop if it's too hot.
Step 2

Blow up your balloon and tie the end. Take a small piece of cellotape and place it just to the side of the knot in the balloon - this will ensure that the balloon stays in one piece when you deflate it later.
Step 3

Place the knotted end of the balloon inside the bowl and secure in place with Sellotape.
Step 4

Pour around a quarter to a third of the dark or milk chocolate onto the balloon followed by a quarter to a third of the white.
Step 5

Leave the chocolate to set either in a cool room, or in the fridge if you want to speed things up. It is ready when the surface is solid enough to touch and no longer shiny.
Step 6

Continue to layer the chocolate onto the balloon, allowing it to set between applications until you have used almost all the chocolate - save about a quarter of the white chocolate to make the base of the bowl.
Step 7

Pour on the final bit of white chocolate and then immediately flip the balloon over onto a piece of baking paper. Hold the bowl or balloon until the chocolate has set enough for you to take your hands away without the balloon moving. Then leave to set for a couple more minutes.
Step 8

Undo the Sellotape which is attaching the bowl to the balloon and then lift off the bowl.
Step 9

Hold onto the knotted end of the balloon and pierce it with a sharp knife in the centre of the piece of Sellotape you attached earlier.
Step 10

Pull gently on the knotted part of the balloon to help let the air out. Once the majority of the air has been released, you should be able to remove the balloon easily.
Step 11

Your bowl is ready to fill with anything you like!
