

If you're looking to gain your strength and fitness back after having a baby, the squat is a great move to get started.
Featuring in HIIT workouts and plenty of postnatal exercise programmes, perfecting the squat form emerges as a fundamental move for new mums. Plus, the benefits speak for themselves, including enhancing overall strength, core stability and the everyday functionality for the demands of motherhood (think: getting up and running after a toddler every five minutes). While you might be a whizz at how to do a perfect press up, a squat requires good form every time to get the most out of the movement and avoid injury. "A squat is a compound exercise that works several muscle groups and joints at the same time," explains personal trainer Jade Hansle. "It's a great exercise that pretty much works the whole lower body as it targets your glutes, quads, hamstrings and calves, while also strengthening the smaller stabiliser muscles and ligaments that support your leg muscles."
But it's not only your legs that get a good workout when it comes to the famous squat, you also "increase mobility in your ankles and hips, which is great for strength and preventing injuries. Your core gets a good workout too as it's a key stabiliser in the movement." So, how do you work your way up to doing the best squat ever? "30 days of squats in all different variations will turn you into a squatting goddess or god by the end of the month," Jade says.
30-day squat challenge: what you'll need
- A space big enough to move freely – this could be at home or in a gym.
- Dumbbells
- Resistance bands
How to perform a perfect squat
Day 1 to 8 – finding the perfect form
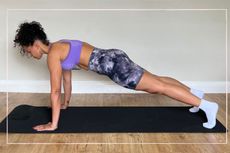
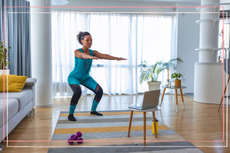
On days one to eight, complete 30 squats a day using just your bodyweight – i.e no equipment. For the first week of the challenge, you’ll be focusing on perfecting your squat form. Without this, you won’t be able to progress successfully onto adding resistance bands or weight. “Begin by standing with your feet just wider than hip-width apart. Hold your arms out in front of you or have your hands together, or down by your sides,” Jade says. “Exhale and engage your core (scroll the bottom to see how to to do this), slowly push your hips to the back of the room and lower down until your thighs are parallel to the ground. Imagine you’re sitting on an invisible chair. Drive through your heels as you come up to a standing position." Don’t forget to stretch afterwards too – scroll down for Jade's stretching routine.

Jade performing the perfect squat technique for days one to eight
Day 9 to 12 – adding resistance
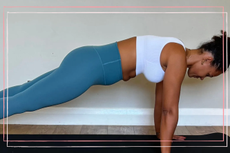
Using resistance bands, perform 25-30 squats a day to make your squat more challenging. While bodyweight squats are great for nailing your technique and are a useful compound movement to add into any HIIT workout you might be doing, you’ll start really feeling the burn when you add resistance. “Now that you’ve mastered the basics, time to add some resistance,” Jade says. “Resistance bands are a great way to make your squat more challenging. They also encourage your glutes to really kick in as your hip abductor muscle has to work to push the band out so your knees don’t cave in.” To use a resistance band in a squat, step into the band and move it up your legs until it’s just above your knees. “Perform the squat as you’ve previously done, ensuring that you are pushing your knees out against the band.”

Jade performing the perfect squat technique with resistance bands
Day 13 to 19 – levelling up with dumbbells
You’ve mastered bodyweight squats and squatting with a resistance band so now it’s time to up the intensity. Jade recommends you do 25 to 30 squats using dumbbells. "Grab some dumbbell weights if you have some. If not, bottles of water or cans of food make good replacements until you can get some” Jade says. “Bring the weights up to your shoulders and get squatting. Remember, shoulders back, chest up, tighten that core and drive through your heels.”

Jade performing the correct squat technique using a pair of dumbbells
Day 20 to 29 – countdown to the end
This is the final push. Once you’ve got the hang of this, you can start bringing your weight up and going for fewer reps. “For the last section of the challenge, we’re going for squats and weights and a resistance band. It may sound like a lot - but stay with me! Follow all the above steps and squat your way to super strong legs and bum,” Jade says.

Jade demonstrating days 20 to 29 of the squat challenge using dumbbells and resistance bands
Day 30 – stretch it out
You’ve completed the the 30-day squat challenge! Throughout the last month, you’ve probably woken up once or twice with sore, achy muscles. That’s completely normal, Jade explains. “The body produces lactic acid whenever you exercise, which contributes to those aching muscles. So instead of amping yourself up for another quad burner, take the last day of the challenge for some extra stretching time. Try to hold each position for 30 seconds and don't forget to switch legs. “Stretching can help to reduce the accumulation of lactic acid throughout the body. It’s proven to ease and relax the muscles after exercise as otherwise they’d stay tight. Loosening up your muscles after a workout will definitely reduce your chance of injury.”

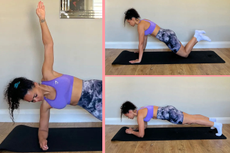
Jade demonstrating three stretches to loosen tight leg muscles after completing the 30-day squat challenge
How to engage your core
Many people say that engaging your core is the position you’d make if you were pulling your belly button inwards.
Here's how Jade teaches her clients to engage their core in the right way:
- Start by lying face-up on the ground with your knees bent and your feet flat on the floor. Place your arms flat beside your body with your hands facing palm-side down on the ground.
- Press your tailbone into the ground so your lower back comes up slightly.
- Breathe in deeply - this is essential. Once your stomach is full of air, tighten your ab muscles while keeping your tailbone pressed into the ground.
- Use your ab muscles to pull your stomach up and inward.
- As you engage your core, it’s important that you continue to breathe but don’t let the air out of your stomach.
- Take three to five breaths while your core is engaged to see how it should feel, relax and try the exercise standing up. This is what you will need to do when you take your squat position.
Why is it important to engage your core during a squat?
Making sure that your core stays tight means that you’ll have the stability to execute your squat safely as the entire trunk of your body, i.e. your ab muscles, pelvic floor, diaphragm and spinal erectors, stays engaged. Bracing your core also protects your spine when lifting heavier weight. And if you want to go onto other functional movements like the traditional deadlift, for example, you’ll need to know how to do this from the off.
Continue reading

Exercise for kids: family fitness and weight-loss activities

How to do a push-up: Follow our 30-day press up challenge

How to do burpees: 30-day burpees challenge and video
"As a Personal Trainer, my passion is to guide people towards a healthier lifestyle. Everybody is unique, with their own strengths and limitations. My method is to build a custom plan based on your health, schedule and more importantly, fitness goals. With a speciality in strength training, I aim to transform your body and help you be the best version of yourself.
I love helping women lift weights and gain confidence in the gym. As a pre and postnatal specialist (and mother of two), I understand the importance of staying fit during and after your pregnancy."
-
 How to play with Barbie dolls: 6 ways to use the iconic doll as a positive role model at home
If you have a little one who loves to play with Barbie, there are lots of positive ways in which you can encourage them to play in a way that helps their development and self-esteem. We’ll show you how.
-
 Think you're raising a mini-me? It's actually unlikely your child will inherit your personality and could have a temperament closer to a 'random stranger', according to new study
If you often hear the phrase 'like mother like daughter,' or 'like father like son,' research suggests you're actually only slightly more likely to share familial traits than with strangers.


-
 How to do a push-up: Follow this 30-day plan - building up to a full bodyweight workout
Follow our 30-day press up challenge to strengthen your upper body – beginning on the knees and gradually building up to a full bodyweight workout
-
 Burpees for beginners: The benefits and how to do them with the proper form
Discover how to do burpees with our 30-day challenge workout - as demonstrated our fitness expert
-
 Thigh exercises: Tone up with our 30-day challenge
Thigh exercises to tone up, and improve strength - follow fitness trainer Jade Hansle's 30-day challenge
-
 The 30-day plank challenge: How to strengthen your core and tone up postpartum
Follow our 30-day plank challenge for just a few minutes every day to tone up without any equipment.
-
 Get fit from home with our 30-day HIIT workout challenge
High intensity interval training is great for time-strapped mums – try these five moves for an all-round workout to get you fit at home
-
 Ab exercises: Lose weight with our 30-day tummy toning challenge
Ladies, we have scary news: summer's here! If you want to feel confident in your clothes this summer, try our 30-day tummy toning challenge...
-
 Sofa exercises: Slim yourself down with our 30-day challenge
You mean to say we could've been exercising from the comfort of our living rooms all this time!?
-
 Your daily 10-minute workout challenge!
You'll be seeing results in just one month!


