How to make a pompom
Make these fluffy pompoms to add some fun to your next craft project


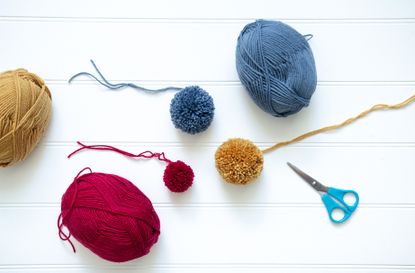
All you need is a piece of cardboard, some scissors and yarn to make bold and fluffy pompoms
Making pompoms is the perfect way to use up scrap pieces of yarn that you have leftover from other craft projects. You can mix up colours and textures to create something truly unique.
Use these fluffy pompom balls as decorations. They can be hung along a piece of ribbon to form a garland or tied onto a piece of cardboard to create a jolly bookmark. If you have more than a couple of scraps of yarn, why not have a go at our knitted bunting instead?
Keep a stash of pompoms in your craft box, ready to be added onto any craft project that needs a bit of colour or fun like our pompom blanket. Or have a go at making something with little ones, like these pompom animals.
To make a pompom you will need:
- Cardboard
- Pencil
- Something circular to draw around, like a cup
- Yarn
- Scissors
For craft supplies, check out John Lewis & Partners
How to make a pompom:
1. Begin by drawing around the circular object or cup onto the cardboard. Then draw a smaller circle inside the first one, a glue stick lid is the perfect size.
2. Cut along the markings so you’re left with a doughnut shape. Repeat so you have two identical doughnuts.
GoodtoKnow Newsletter
Parenting advice, hot topics, best buys and family finance tips delivered straight to your inbox.
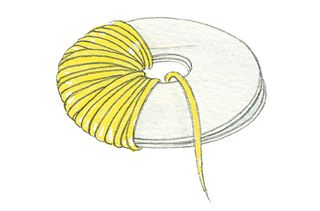
3. With the two cardboard doughnuts stacked on top of one another, begin winding yarn around the cardboard pieces working your way around the circle.

4. Keep winding until it becomes impossible to fit the yarn through the hole in the centre.
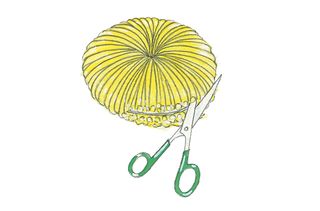
5. Holding the yarn and cardboard tightly in one hand, insert the scissors and snip through the edges. Once you’ve made a couple of snips, you should be able to squeeze the scissors in between the cardboard pieces to make cutting the yarn easier.

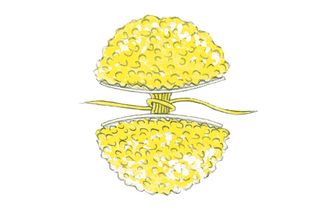
6. Once you’ve cut all the way around the edge, take another piece of yarn and slot it between the cardboard pieces. Pull the ends of the yarn together and tie in a knot, making sure the knot sits as close to the middle of the pompom as possible. Add a double knot to secure and leave these yarn ends long for hanging later.

7. Slip the cardboard pieces off the pompom or cut them away if it feels too tight.
8. Give the pompom a shake until it begins to resemble a ball shape.
9. Now trim the yarn ends with your scissors to form a neat and spherical pompom.
Top tip:
If you don’t have time for the circle drawing and cardboard cutting, think about investing in a pompom maker instead. They halve the time it takes to make a pompom with the traditional method.

Esme is Future's resident craft expert, working across titles such as GoodTo, Woman&Home, Woman’s Weekly, Woman, Woman’s Own, Chat, Now, Pick Me Up and The Craft Network. Successfully turning her sewing hobby into a career, she's adept in a number of crafts, including sewing, papercraft, calligraphy, embroidery and printing.
-
 Worried about your teen 'being smelly'? They can't help it, according to scientists, and help is on its way to ease the problem
We know that puberty can cause all sorts of smells to emanate from teens - now scientists have revealed exactly what you're smelling, and how evolution contributed.
By Lucy Wigley Published
-
 Parenting coach shares 4 'powerful' reframes to try next time it feels like your kid is pushing all your buttons (and #4 is a game changer)
A parenting coach has shared four ways parents can reframe their thoughts when their kid has big emotions. Giving them a try could offer big results in little time.
By Lucy Wigley Published