

If you're looking to give your storage a bit of a facelift, why not try this super simple idea? Here's how to make a set of fabric storage baskets.
We've created our storage baskets with a whimsical floral fabric, but why not try a bold geometric print in monochrome or go crazy for colour with bright solid shades. Either way, banish bland and boring boxes in favour of something fun to clear the clutter in your home.
To make these storage baskets you will need:
- Five Tilda fabric fat quarters
- Firm iron-on interlining, £4 per m, Lady Sew and Sew
- Bias binding maker
- Matching thread
- Sewing machine
- Scissors
- Ruler
- Iron
How to make these storage baskets:
- For the large box, cut out five 20cm squares from the fabric and fuse the interlining to the wrong side. Cut out another five 20cm squares from a different fabric for the lining. Repeat for the small box, cutting out 16cm squares instead.
- Pin four of the squares with interlining along each side and with right sides together to create a cube. Sew along the edges with a 1cm seam allowance; stop sewing 1cm from the bottom of each seam. Making sure to backstitch at the ends for extra durability.
- Position the cube on top of the fifth square of fabric with the fused interlining. Pin the bottom edges to the base and sew in place with a 1cm seam allowance. Turn right sides out and press the seams open.
- Repeat with the other lining squares, leaving the lining wrong sides out. Position the linings inside the baskets with top edges aligned and pin together.
- Make two strips of binding from the leftover fabric measuring 80cm in length for the large box and 65cm for the small one. You will need to join the short ends of several strips together to create long-enough pieces.
- Use the binding to sandwich the raw edges of the boxes, removing the pins from the basket as you work around and replacing them once they have binding. Topstitch the binding in place, overlapping the ends to conceal the raw edges.
-
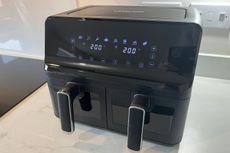 I tested the Lakeland Dual Basket air fryer and it made midweek family cooking a breeze
You can’t go wrong with the dual basket air fryer by Lakeland complete with easy-view windows to ensure burnt food is a thing of the past…
-
 Reframing one simple habit could get your sex life back on track after having a baby, new research shows
Many parents struggle to get their sex life back on track after having a baby, but new research has shown how one simple habit could make all the difference.

