

Stash your little one’s presents in this handmade Christmas sack fit for Santa himself.
Make your child's Christmas with this simple craft project, ready to be filled with all their gifts on Chritmas Eve.
You can even personalise the Christmas sack with an applique of the child's name.
Our easy-to-follow project requires only basic sewing skills and is the perfect way to keep costs down this Christmas by using up leftover fabric.
You can also use the same pattern to create a toy storage sack or a drawstring laundry bag that can be used all year round.

What you'll need to make your own Christmas sack
- 70cm x 1m rectangle of Christmas fabric
- Measuring tape
- Fabric scissors
- Iron
- Pins
- Sewing machine
- Matching sewing thread
- Safety pin or bodkin
- 15mm-wide red grosgrain ribbon
How to make your own Christmas sack
1. Cut the Christmas fabric in half so that you have two pieces of fabric measuring 70cm long by 50cm wide.
2. Take the first piece and fold the two long sides over by 1cm. Press, fold again and press to hide the raw edges. Pin and stitch in place. Repeat for the other piece of fabric.

3. Fold one short edge in by 1cm and press. Then fold the same edge in by 4cm and press – this will be the casing for the ribbon. Pin and topstitch in place as close to the folded edge as possible. Repeat for the other piece of fabric.
4. Pin the two pieces of fabric together with right sides facing and, starting at the bottom of the casing, sew down one side, along the bottom and up the other side, making sure to stop at the bottom of the casing. Turn the sack right side out and press.

5. Attach the safety pin or bodkin to the end of the length of ribbon and thread through the drawstring casing at the top of the sack. Once you’ve gone all the way through to the other end, hold both ends of the ribbon and pull the sack closed.

6. Finally, tie the ribbon ends together in a knot to finish, and trim off any frayed strands.
-
 Reframing one simple habit could get your sex life back on track after having a baby, new research shows
Many parents struggle to get their sex life back on track after having a baby, but new research has shown how one simple habit could make all the difference.
-
 Child psychologist unveils 'the grandparent code', a list of 12 grandparenting rules to keep family relationships strong and healthy
Some are common sense, others may be a little harder to follow...


-
 Best Christmas crafts for kids: Easy festive crafting ideas for families
 -
 How to make copper candles
 -
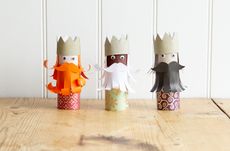 How to make the three kings from toilet roll
Create your very own homemade nativity, including these festive three kings from leftover toilet rolls
-
 How to make an origami Christmas tree
Learning how to make a set of origami Christmas tree decorations is easy, all your need is some green paper, a pair of scissors, and a ruler
-
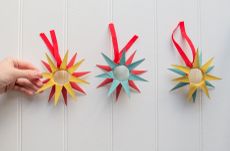 How to make toilet roll Christmas decorations
Turn your unwanted toilet roll tubes into these colourful Christmas decorations - it's a great way to combat waste whilst decorating your home
-
 How to make a handprint Christmas tree card
Have a crafty afternoon with the kids making this fun and cheap handprint Christmas tree card, all you need is some green paper, sequins and glue!
-
 How to make a floral Christmas wreath
Give guests a festive greeting with a fresh flower Christmas wreath hung on your front door
-
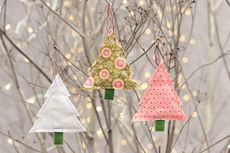 How to make Christmas patchwork decorations
Sew up a set of stylish patchwork decorations for your tree this Christmas


