

Make these personalised Christmas decorations from air-drying clay to hang on your Christmas tree.
Add a homemade touch to your Christmas tree with these easy-to-make hanging alphabet decorations.
Spell out a festive word like joy, or decorate your tree with your loved ones initials or your family names? .
Worked your way through the entire alphabet? Try making decorations in different festive shapes instead. A gingerbread man or star cookie cutter work really well too.
READ MORE: See all of our easy Christmas crafts ideas

To make your personalised Christmas decorations you will need:
- Alphabet cutters
- White air-drying clay
- Watercolour or acrylic paint
- Small paintbrush
- Wooden skewer
- Craft knife
- Thin ribbon or twine
- Rolling pin
- Rolling pin guide rings (to get an even thickness when rolling)
- Cutting mat
- Paper
- Old newspaper

How to make your personalised Christmas decorations:
1. Take a small piece of clay from the block and begin rolling it out on a clean surface. Use the rolling pin guide rings to get an even thickness of approximately 8mm depending on how thick you want your decorations to be.
2. Pick out the alphabet cutters you’d like to use, we chose to spell the word JOY with our decorations. Push the alphabet cutters into the clay and carefully push the clay cutouts free of the moulds.
Alternatively, cut out the letters freehand using a craft knife or print out your chosen word on a computer, cut out, place over the clay and trace around using the craft knife.

3. Gently smooth out any markings on the surface with your fingertips and use a craft knife to neaten up the edges. Use the skewer to pierce a hole through the top of the letters for hanging. Allow the clay to dry for at least 24 hours.
4. Once dry, use the paintbrush and either watercolour or acrylic paint to colour and detail your letters. Place old newspaper down to protect your surfaces and get creative!
We’ve chosen to paint ours with festive greenery like mistletoe, pine cones and holly in a mixture of blues, greens and reds. Use our images as a guide to trace your design on the clay decorations using a pencil. Apply a small amount of paint and allow to dry.

5. Thread thin ribbon or twine through the hole, trim and tie into a loop. Now your decorations are ready to hang.

-
 Compromising may be killing your relationship - here are 5 ways to reach healthy compromises, according to relationship expert
Compromising isn't always the best way to keep the peace in a relationship
-
 Best interactive pets for kids: 15 gift ideas for children of all ages
From puppies to axolotls, take a look at our selection of the best interactive pets you can buy that are sure to be a hit with little animal lovers


-
 Best Christmas crafts for kids: Easy festive crafting ideas for families
 -
 How to make copper candles
 -
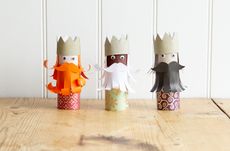 How to make the three kings from toilet roll
Create your very own homemade nativity, including these festive three kings from leftover toilet rolls
-
 How to make an origami Christmas tree
Learning how to make a set of origami Christmas tree decorations is easy, all your need is some green paper, a pair of scissors, and a ruler
-
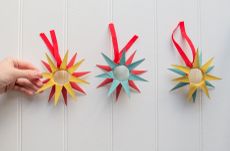 How to make toilet roll Christmas decorations
Turn your unwanted toilet roll tubes into these colourful Christmas decorations - it's a great way to combat waste whilst decorating your home
-
 How to make a handprint Christmas tree card
Have a crafty afternoon with the kids making this fun and cheap handprint Christmas tree card, all you need is some green paper, sequins and glue!
-
 How to make a floral Christmas wreath
Give guests a festive greeting with a fresh flower Christmas wreath hung on your front door
-
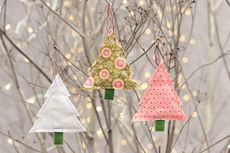 How to make Christmas patchwork decorations
Sew up a set of stylish patchwork decorations for your tree this Christmas


